What is Zoom Whitening?
Zoom whitening is a popular and effective teeth whitening procedure. It uses a special bleaching gel, often containing hydrogen peroxide, and a unique light to accelerate the whitening process. While professional Zoom whitening is done in a dentist’s office, Zoom also offers at-home kits. These kits allow you to achieve a brighter smile from the comfort of your own home. The at-home version typically involves custom-fitted trays and a lower concentration of the whitening agent compared to the in-office procedure, ensuring safety and effective results. It’s a convenient way to combat stains and discoloration caused by coffee, tea, tobacco, and aging, leading to a noticeably whiter and more confident smile. When following the provided instructions, you can expect visible results within a few days to a couple of weeks, making it a popular choice for those seeking a brighter, more youthful appearance.
Benefits of Zoom Whitening at Home
Choosing Zoom whitening at home offers several advantages. Primarily, it provides convenience and flexibility. You can whiten your teeth on your schedule, without the need for frequent dental appointments. This is especially beneficial for individuals with busy lifestyles. The cost-effectiveness of at-home kits is another significant benefit, as they are typically less expensive than in-office treatments. Moreover, the at-home kits allow for gradual and controlled whitening, reducing the risk of tooth sensitivity, which can sometimes occur with stronger in-office procedures. With consistent use, you can achieve significant improvements in the brightness of your teeth, leading to a boost in self-esteem and a more attractive smile. Furthermore, at-home kits are designed for ease of use, with clear instructions and user-friendly applications that can be easily integrated into your daily routine.
Step 1 Preparation for Zoom Whitening

Before starting your Zoom whitening journey at home, proper preparation is key to ensure both effectiveness and safety. It’s crucial to consult with your dentist before using any at-home whitening kit, even if it is a product from Zoom. They can assess your oral health, identify any existing dental issues like cavities or gum disease, and determine if at-home whitening is suitable for you. Following your dentist’s advice will help you avoid complications and achieve the best possible outcome. Ensure that you have all the necessary supplies ready before starting the procedure. These supplies often include the whitening gel, the custom-fitted trays, and the special light that is part of the Zoom kit. Make sure to read all instructions, and if you have questions ask your dentist.
Gathering Your Supplies
Ensure you have all the essential components of the Zoom whitening kit at hand. This typically includes the whitening gel, the custom-fitted trays for your upper and lower teeth, and the activating light device. Also, prepare a soft-bristled toothbrush, a mirror, and a timer or clock. It’s also helpful to have a clean, dry cloth or paper towels nearby. Familiarize yourself with each item and read through the kit’s instructions. This will prevent any last-minute confusion and ensure a smooth application process. Make sure the whitening gel is stored in a cool, dry place as per the instructions, and check the expiration date to ensure optimal effectiveness. Having all your supplies organized and accessible will contribute to a more convenient and efficient whitening experience.
Preparing Your Teeth
Prior to applying the whitening gel, it is important to clean your teeth thoroughly. Gently brush your teeth with a soft-bristled toothbrush to remove any food particles or plaque. Flossing can also be a helpful step to ensure that all areas between your teeth are clean. Rinse your mouth thoroughly with water to remove any remaining debris. Avoid using toothpaste, as it can create a barrier between the whitening gel and your teeth. Ensure your teeth are dry before proceeding to the next step. By properly preparing your teeth, you create an ideal environment for the whitening gel to work effectively. This will also help in preventing any potential irritation or discomfort during the whitening process.
Step 2 Applying the Zoom Whitening Gel

Applying the Zoom whitening gel is a critical step in the process, directly impacting the effectiveness of the treatment. Precise and careful application is crucial for achieving the desired results without causing any unnecessary sensitivity or discomfort. Remember, less is often more with these gels, so avoid overfilling the trays, which can lead to the gel overflowing and irritating your gums.
Applying Gel to Tray
Carefully squeeze a small amount of the Zoom whitening gel into each tooth impression of your custom-fitted trays. A small bead of gel for each tooth is generally sufficient. Avoid overfilling the trays, as excessive gel can lead to gum irritation and waste product. Ensure the gel is evenly distributed within each tray. This ensures that all surfaces of your teeth are exposed to the whitening agent. The provided instructions will guide you on the appropriate amount of gel to use. Overfilling the trays can cause the gel to come into contact with your gums. If this occurs, remove the excess gel with a clean cotton swab. Clean the trays immediately after use for the next use.
Inserting the Tray
After applying the gel to the trays, carefully insert the trays into your mouth, ensuring that they fit snugly against your teeth. Gently press the trays to ensure proper contact with all tooth surfaces. Remove any excess gel that might have squeezed out during insertion. You should feel a comfortable fit, without any excessive pressure. Make sure the trays are properly seated to maximize the contact between the whitening gel and your teeth. If you experience any discomfort or excessive pressure, remove the trays and check for any adjustments needed. Clean the trays and reapply the gel for the next round.
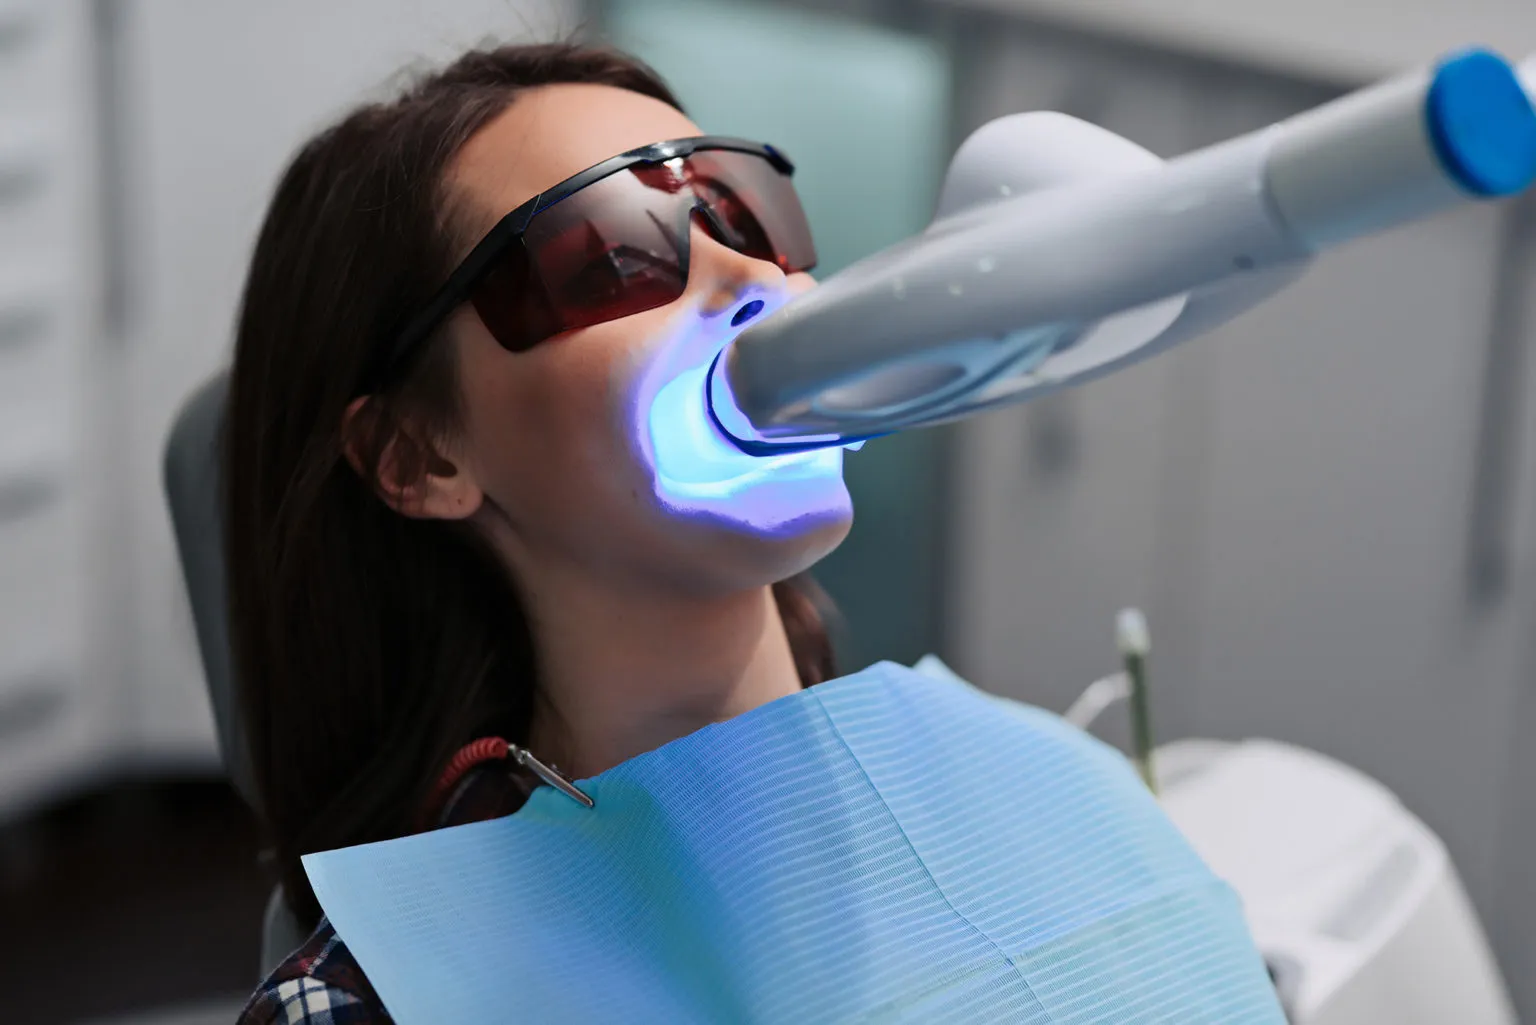
Step 3 Using the Zoom Whitening Light

The Zoom whitening light is designed to activate the whitening gel, accelerating the process of teeth whitening. This light enhances the effectiveness of the gel, helping you achieve brighter teeth. Proper use of the light is a crucial step to the Zoom whitening procedure. Following the instructions is important for the success of the process.
Positioning the Light
Once the trays are securely in place, position the Zoom whitening light according to the manufacturer’s instructions. Ensure the light is directed towards your teeth, usually at a specific distance, to maximize the whitening effect. Make sure the light does not come into contact with your skin or eyes, as it may cause irritation. The light’s position should be stable throughout the whitening cycle. Check that it remains steady during the whole application. If you have any concerns, refer to the specific instructions provided with your Zoom whitening kit to ensure safety and effectiveness.
Whitening Cycle Duration
Adhere to the recommended whitening cycle duration as specified in your Zoom whitening kit instructions. This will typically involve wearing the trays for a certain amount of time, often in increments of time. Set a timer to accurately track the application time, and avoid exceeding the recommended duration, as this can lead to increased tooth sensitivity or other complications. Once the cycle is complete, remove the trays and rinse your mouth thoroughly. The time will vary depending on the Zoom whitening kit you have. Always consult the instructions provided by your dentist or the manufacturer for your specific kit to determine the appropriate duration.
Step 4 Post-Treatment Care

After completing a Zoom whitening session at home, proper post-treatment care is essential to protect your newly whitened teeth and extend the life of your results. This involves several crucial steps, including rinsing your mouth and avoiding foods and drinks that can stain your teeth.
Rinsing Your Mouth
After removing the trays, rinse your mouth thoroughly with water to remove any residual gel. Avoid swallowing any remaining gel. You can also use a fluoride rinse to help remineralize your teeth and reduce sensitivity. Gently brush your teeth with a soft-bristled toothbrush to remove any remaining gel residue. Be gentle while brushing. These steps help to ensure all whitening gel is removed from your mouth. Always follow all the specific instructions provided with your kit.
Avoiding Staining Foods and Drinks
For at least 24 to 48 hours after each whitening session, it is crucial to avoid foods and drinks that can stain your teeth. This includes coffee, tea, red wine, dark sodas, and heavily pigmented foods like berries, soy sauce, and curry. Tobacco products should also be avoided, as they can significantly diminish the effects of whitening. Opt for a clear or light-colored diet during this period. Drinking through a straw can also help minimize contact with potentially staining substances. By following these precautions, you can significantly enhance the longevity of your whitening results and keep your smile bright and beautiful.
Step 5 Maintaining Your Results

Maintaining the results of your Zoom whitening treatment at home requires a consistent approach to oral hygiene and lifestyle choices. This helps to extend the life of your whiter smile and keep your teeth looking their best. Following proper oral hygiene, regular dental visits, and making mindful lifestyle choices will contribute to the longevity of your brighter smile.
Regular Dental Checkups
Schedule and attend regular dental checkups and professional cleanings. Your dentist can assess the condition of your teeth and gums. Professional cleanings help to remove any surface stains that may have accumulated. They also keep your mouth in great shape. These professional maintenance measures are essential for preserving your smile. By following your dentist’s advice, you can maintain your results for an extended period. Professional maintenance is important for long lasting teeth whitening.
Tips for Long-Lasting Whiteness
In addition to regular dental checkups, there are steps you can take to prolong the brightness of your teeth. Minimize your consumption of staining foods and drinks. Practice good oral hygiene, including brushing twice a day and flossing daily. Avoid smoking and other tobacco products, as they are major contributors to tooth discoloration. Consider using a whitening toothpaste or mouthwash as part of your daily routine to maintain your results. By incorporating these habits, you can preserve your whitened smile for years to come. Remember that consistency is key to maintaining long-term results.