Understanding the Teeth Whitening Shades Chart
Embarking on a teeth whitening journey can be exciting, but understanding the various shades and how to measure your progress is crucial. The teeth whitening shades chart, often based on the VITA shade guide, is a standardized tool that helps both dentists and patients visualize and track the changes in tooth color. This guide provides a structured way to assess the current shade of your teeth before the whitening process, monitor the progress during the treatment, and ultimately, celebrate the achievement of your desired brighter smile. It’s more than just a color chart; it’s a vital component in setting realistic expectations and achieving optimal results. This comprehensive overview ensures you are well-informed and prepared for the journey to a more radiant smile.
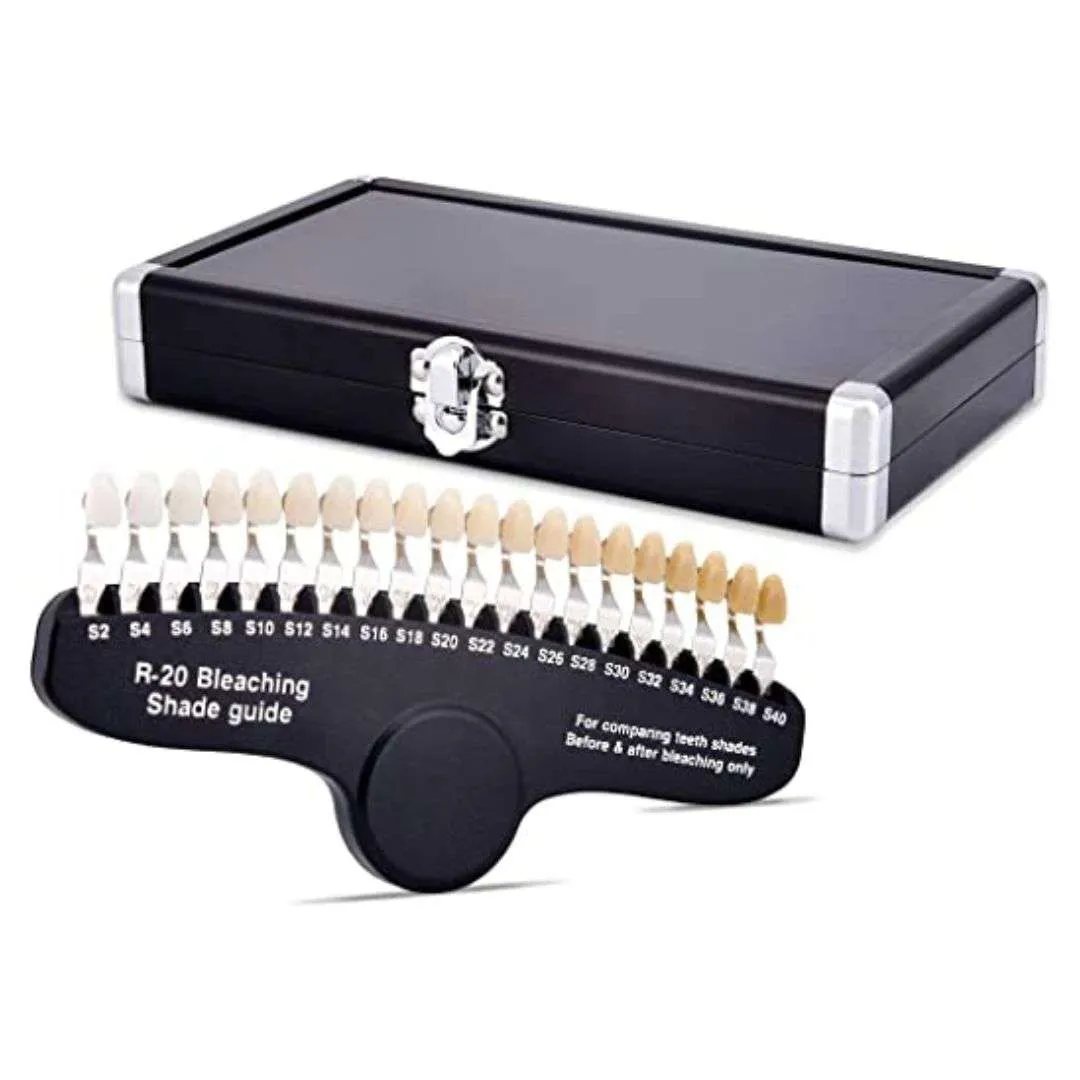
What is the VITA Shade Guide?
The VITA shade guide is the gold standard for dental professionals worldwide when it comes to matching and recording tooth shades. Developed by VITA Zahnfabrik, this guide is a physical tool that consists of a set of tooth-shaped tabs, each representing a different shade of natural teeth. These tabs are made of porcelain or ceramic and are designed to mimic the light-reflecting properties of real teeth. The guide is used to determine the existing shade of a patient’s teeth before any cosmetic dental work, such as teeth whitening, veneers, or crowns. The VITA shade guide ensures consistency and accuracy, allowing dentists to communicate effectively with labs and patients about the desired final outcome.
How the VITA Shade Guide Works

Using the VITA shade guide involves a systematic process. Your dentist will place the shade tabs next to your teeth, under consistent lighting conditions, to compare and find the closest match. The process is typically done in a well-lit environment, preferably with natural light or a standardized lighting system, to avoid color distortion. The dentist will assess the teeth, comparing them with the shade guide until the closest match is identified. The selected shade becomes the baseline for the treatment. During teeth whitening sessions, the dentist will revisit the shade guide to monitor the progress. This enables adjustments to the whitening process, ensuring the teeth achieve the desired shade and providing a visual record of the transformation.
Shade Categories in the VITA Guide
The VITA shade guide is organized into several shade categories, each identified by a letter and a number. These categories help to classify the different shades based on their color and intensity. Understanding these categories is crucial for anyone considering teeth whitening, as it provides a way to articulate the desired results effectively. The primary categories include A, B, C, and D, each representing a different range of tooth colors, from reddish-brown to yellowish-red, grey, and reddish-grey. Each category is further subdivided by numbers (1 to 4), indicating the lightness or intensity of the shade; 1 being the lightest and 4 the darkest within that category. These categories, described further below, help provide a detailed understanding of the nuances of teeth shades.
A1, B1, C1 and D2
These are the lightest shades on the VITA shade guide. A1 represents a light reddish-brown, often desired by patients seeking a bright, natural look. B1 is a light yellowish-white, offering a clean and bright appearance. C1 signifies a light greyish shade, less common but still within the range. D2 is a light reddish-grey. These shades are often the target for those looking for dramatic whitening results. Understanding the nuances of each shade helps in setting realistic expectations and achieving the desired level of brightness. Consulting with a dentist will further clarify the best shade option, providing an overall understanding of the possible outcomes of teeth whitening.
A2, B2, C2 and D2

These shades are slightly darker than the A1, B1, C1, and D2 categories. A2 is a reddish-brown shade, offering a natural appearance. B2 is a yellowish-white shade, commonly seen in patients. C2 offers a medium greyish hue. D2 is a medium reddish-grey. These shades often serve as a starting point for many patients. They are well-suited for those seeking a noticeable improvement without an overly dramatic change. The choice between these shades depends on individual preferences and the natural color of the teeth. The ultimate goal is to achieve a balanced and aesthetically pleasing result.
A3, B3, C3 and D3
These are medium shades. A3 presents a medium reddish-brown. B3 is a medium yellowish-white, and C3 offers a medium grey. D3 presents a medium reddish-grey, which are more common starting shades for adults. These shades require a more intensive whitening process. The dentist will evaluate the starting shade to determine the best approach. Factors such as the patient’s age, genetics, and lifestyle will all affect the intensity of whitening. The final shades will depend on the selected treatments and the desired outcomes. It is important to communicate effectively with the dentist to achieve your desired results.
A4, B4, C4 and D4
These are the darkest shades. A4 is a dark reddish-brown, while B4 is a dark yellowish-white. C4 offers a dark greyish hue, and D4 presents a dark reddish-grey. These shades typically require more aggressive whitening treatments. Achieving desired results may take multiple sessions or more advanced whitening techniques. Patients with these starting shades will often see a significant transformation with professional whitening. Understanding the starting point and the potential journey will help to ensure that expectations align with outcomes. A skilled dentist will advise on the best strategies for a brighter, more radiant smile.
Why is the Shade Guide Important?

The teeth whitening shades chart is more than a simple reference; it’s a cornerstone for effective communication and expectation management. For dentists, the chart allows for precise documentation of a patient’s initial tooth shade, ensuring that all team members understand the starting point. Throughout the whitening process, the dentist uses the chart to track progress, making adjustments to the treatment plan as needed to achieve the desired results. For patients, the shade chart provides a visual reference. They can understand their starting point and the potential range of results. This visual understanding is key to managing expectations and preventing disappointment. Using a shade guide helps to ensure that the patient and dentist are aligned on the final goal, which leads to greater satisfaction with the results. This transparency builds trust and confidence throughout the teeth whitening journey.
Managing Expectations with Teeth Whitening
Realistic expectations are paramount when considering teeth whitening. While the shade chart offers a clear guide, it’s essential to understand that individual results vary based on several factors. The natural shade of your teeth, the presence of existing dental work, and the type of staining all influence the outcome. The shade chart helps set a framework, but it is not a guarantee. Discussing your expectations with your dentist is essential. They can assess your teeth and give a more accurate estimate of the potential results. They can also recommend the most suitable whitening method for your particular situation. Understanding the limitations of the process and the potential range of outcomes will increase the chances of being satisfied with the final result.
Factors Influencing Whitening Results
Several factors impact the effectiveness of teeth whitening. The composition of your teeth is crucial. Some individuals have naturally more porous enamel, which absorbs the whitening agent better, leading to faster and more dramatic results. The type of stains also plays a role; extrinsic stains, such as those from coffee, tea, and smoking, tend to respond well to whitening. Intrinsic stains, which originate from within the tooth, may be more resistant. The age of the patient’s teeth also has a part; the older the teeth, the more likely they are to have deeper stains. Also, certain medications, like tetracycline, can cause stubborn staining. Additionally, the concentration and type of the whitening agent used, along with the duration of the treatment, can affect the results. A consultation with your dentist will evaluate these aspects and develop a plan suited for you.
Assessing Your Starting Shade

Before starting any teeth whitening treatment, the dentist will assess your current tooth shade. This assessment is done using the VITA shade guide and other tools, ensuring an accurate baseline. This process includes a thorough examination of the teeth to identify any existing dental work or underlying conditions. The dentist will also discuss your lifestyle, habits, and any potential sensitivity concerns. This detailed assessment helps the dentist develop a personalized treatment plan, choosing the appropriate whitening method and the number of sessions needed. The starting shade serves as a reference point and is tracked throughout the process, allowing both the dentist and the patient to monitor the progress and make any necessary adjustments.
How to Use the Teeth Whitening Shade Chart
The teeth whitening shade chart is used to provide a visual representation of your teeth’s current shade and any changes during the whitening process. Typically, a dentist will start by using the shade guide to determine your baseline. The dentist or dental hygienist will then compare your teeth to the shade tabs under standardized lighting conditions. They’ll select the tab that most closely matches the color of your teeth. This selected shade is recorded and serves as your starting point. During the whitening treatments, the dentist will re-evaluate your teeth, comparing them to the shade guide at each session. They will document the progress, helping you see how much your teeth have brightened. This process helps to track and evaluate the treatment’s effectiveness.
Consulting Your Dentist
Consulting your dentist is a crucial step in using the teeth whitening shade chart effectively. Your dentist will not only use the shade guide to assess your starting shade but also provide professional guidance. They can evaluate the condition of your teeth, identify any underlying issues, and recommend the most suitable whitening treatment. They will explain the process, manage your expectations, and address any concerns you may have. A dentist can also monitor your progress during the treatment, making necessary adjustments to ensure optimal results and minimize any side effects, such as sensitivity. Regular check-ups and consultations ensure a safe and successful teeth whitening experience, contributing to a brighter and healthier smile.
Taking Before and After Photos

Taking before and after photos is an excellent way to document your teeth whitening journey. These photos provide a visual record of your progress, allowing you to see the transformation over time. Before beginning the whitening process, take pictures of your teeth under consistent lighting conditions, using the same camera settings. This will serve as your baseline. During the whitening sessions, take photos at regular intervals to track the changes. After completing the treatment, take the final after photos, comparing them with the before pictures. This visual comparison will highlight the degree of improvement and will serve as a motivational tool. Before and after photos are also useful for discussing the results with your dentist and for sharing your success with others.
Maintaining Your Whitened Smile
Maintaining your whitened smile requires a combination of home and professional care. After teeth whitening, it is crucial to avoid foods and drinks that can stain your teeth, such as coffee, tea, red wine, and dark-colored berries. Brushing your teeth twice a day with a whitening toothpaste and flossing daily helps remove surface stains and plaque. Consider using a straw for beverages that stain, such as soda and juice. Regular dental check-ups and professional cleanings are also essential. These appointments allow the dentist to monitor your teeth, remove any accumulated stains, and provide touch-up treatments. Consistently maintaining your oral hygiene will help prolong the results of your teeth whitening treatment, ensuring you enjoy a brighter, healthier smile for longer.
Home Maintenance
Home maintenance is vital for maintaining the results of your teeth whitening. Brush your teeth twice a day with a whitening toothpaste that contains fluoride to remove surface stains. Use a soft-bristled toothbrush and brush gently to avoid damaging your enamel. Floss daily to remove plaque and food particles from between your teeth. Consider using a whitening mouthwash after brushing to further enhance brightness. Limit the consumption of staining foods and drinks, such as coffee, tea, red wine, and dark-colored berries. Use a straw to drink beverages that can stain your teeth. If you are a smoker, consider quitting to avoid staining. Home touch-up kits, available from your dentist, can provide additional whitening. Implementing these strategies can help you keep your smile bright and fresh.
Professional Maintenance

Professional maintenance is essential for long-lasting results. Regular dental check-ups and cleanings are the cornerstone of maintaining a bright smile. Schedule these appointments every six months, or as recommended by your dentist. During these visits, the dentist will examine your teeth, remove any plaque and tartar, and polish your teeth to remove surface stains. Your dentist may also offer professional touch-up whitening treatments to keep your teeth looking their best. These treatments use stronger whitening agents than those available over-the-counter. They provide a boost to your smile. Your dentist may also offer advice on home maintenance. Combining regular professional care with good oral hygiene will ensure that your teeth remain bright and healthy.
Tips for a Brighter Smile
Achieving and maintaining a brighter smile is achievable through simple yet effective strategies. Brush your teeth twice daily with a fluoride toothpaste. Floss daily to remove plaque and debris. Limit the consumption of stain-causing foods and drinks, such as coffee, tea, and red wine. If you use tobacco products, consider quitting. Use a straw for beverages that can stain your teeth. Consider using whitening toothpaste or mouthwash to help brighten your teeth. Regular dental check-ups and professional cleanings are also essential. Your dentist can provide professional whitening treatments and advice on maintaining your smile. Following these tips, you can keep your teeth bright and healthy for years to come.