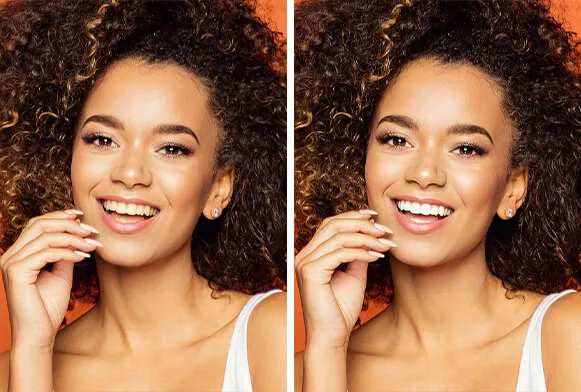
Understanding Teeth Whitening in Photoshop
In the realm of digital image manipulation, Photoshop provides powerful tools to enhance various aspects of an image. One of the most common uses is teeth whitening. Whether you’re dealing with a photo of yourself, a friend, or a professional portrait, yellowed or stained teeth can be easily and effectively corrected using Photoshop. This process not only improves the aesthetic appeal of the image but also contributes to a more polished and professional look. Understanding the principles behind this technique is essential for achieving natural-looking results that don’t appear overly edited. It’s about subtle enhancements, not drastic transformations.
Why Whiten Teeth in Photoshop
There are several reasons why photographers and photo editors choose to whiten teeth in Photoshop. First and foremost, it’s about enhancing the overall look of a portrait. Discolored teeth can be distracting and detract from an otherwise perfect image. Whitening teeth corrects this issue. Furthermore, in the context of professional photography, this touch-up is often expected. Clients anticipate a certain level of refinement, and teeth whitening is a standard practice. This can be critical for headshots, model portfolios, and even personal photos that are intended for public display or marketing materials. The ability to make these adjustments ensures consistency and quality across all visual communications.
Benefits of Digital Teeth Whitening

The benefits extend beyond mere aesthetics. Digital teeth whitening in Photoshop allows for a level of control and precision that is impossible to achieve with traditional methods. This can be particularly advantageous if teeth have different levels of discoloration. Moreover, unlike physical teeth whitening procedures, it is cost-effective and immediate. The ability to make quick adjustments provides editors with the ability to match the whitening levels to different skin tones, ensuring the final image looks cohesive. Additionally, this process can be undone, allowing for non-permanent changes. It offers flexibility that is hard to find elsewhere. This ensures the final product aligns perfectly with the overall vision of the photograph.
Step-by-Step Photoshop Teeth Whitening
This detailed, step-by-step guide to teeth whitening in Photoshop offers a simplified but comprehensive approach. It focuses on non-destructive techniques and natural results. Whether you are a beginner or an experienced user, this method will refine your skills, enhance your images, and create a more polished look. Each stage is carefully explained. Each step has accompanying tips, and practical examples, which enables you to quickly grasp and use the concepts. The aim is to empower you with the skills to enhance your portraits professionally. This will dramatically improve your editing workflow.
Open and Prepare the Image
Begin by opening the image in Photoshop. Ensure the image is in RGB mode by going to Image > Mode > RGB Color. Duplicate the background layer by pressing Ctrl/Cmd + J. This is a crucial step, as it preserves the original image and allows for non-destructive editing. This practice means that any adjustments you make will not directly affect the original pixels. It allows you to revert any changes if needed. It also prevents unwanted modifications that could impact the overall quality. This initial preparation is the foundation for a smoother editing experience.
Select the Teeth

The next crucial step is to select the teeth accurately. This is the foundation for the entire process and determines how realistic the result will look. There are several tools available, but the Lasso Tool and Quick Selection Tool are the most common choices for this task. The accuracy of your selection directly impacts the outcome, so take your time and zoom in closely to ensure a precise outline around the teeth. Precise selection makes all the difference. Poor selections can result in unnatural appearances, while accurate selections allow for seamless enhancements.
Using the Lasso Tool
The Lasso Tool is ideal for freehand selections. Choose this tool from the toolbar. Click and drag around the teeth, carefully outlining their edges. This is best used when you need to make an exact selection with sharp edges, as the Lasso Tool gives you complete control over the selection path. This is suitable when the edges are not too complex. However, keep in mind that it may take more time and precision to outline the teeth precisely. This can sometimes be difficult for beginners to master. With practice, you can use the Lasso Tool to make precise selections that yield natural-looking results.
Using the Quick Selection Tool
The Quick Selection Tool is often faster. This tool intelligently detects edges and allows you to make a selection by simply painting over the areas you want to include. Use the plus and minus brushes to add or subtract areas from the selection. This can be particularly efficient when the edges are clearly defined. With this tool, you can quickly select complex shapes. However, fine-tuning is usually necessary to ensure that you have not included unwanted areas. Careful adjustments can make the process faster and more effective.
Adjusting Brightness and Contrast

Once the teeth are selected, you can adjust the brightness and contrast. This step involves using adjustment layers. Go to Layer > New Adjustment Layer and select Brightness/Contrast. This adjustment layer will only affect the selected area. This method is crucial to avoid affecting the other parts of the image. You can then use the sliders to subtly increase the brightness and slightly adjust the contrast. Overdoing this step can lead to an unnatural appearance. The goal is to gently lift the shadows and create a more uniform appearance.
Applying a Curves Adjustment
A Curves Adjustment is a more precise method for altering brightness and contrast. Create a new Curves adjustment layer by going to Layer > New Adjustment Layer > Curves. This tool gives you fine control over the tonal range. In the Curves panel, create a slight S-curve to increase contrast, and slightly lift the shadows by raising the lower end of the curve. Subtle changes are best here. This provides a refined look, while still avoiding unnatural results. This method is more advanced and can be very effective in getting the perfect level of brightness and contrast.
Using the Dodge and Burn Tools
The Dodge and Burn tools allow you to selectively lighten and darken specific areas. Select these tools from the toolbar. Set the Range to Midtones and the Exposure to a low percentage. Gently brush over the teeth, using the Dodge tool to lighten areas and the Burn tool to darken areas. This will help to even out any unevenness in the tooth color. This detailed control will ensure that the final results are natural. This technique will add highlights and shadows. This will increase the three-dimensional appearance and enhance the overall effect.
Refining the Selection and Edges

Once the initial adjustments are made, refine the selection edges. This helps create a seamless blend. Go to Select > Modify > Feather and apply a small feather radius (e.g., 0.5 to 1 pixel). This softens the edges of the selection. This prevents harsh lines and makes the teeth appear more natural. You can also use the Refine Edge tool to further smooth and blend the selection. Fine-tuning these details is essential for achieving realistic and professional results.
Color Correction and Enhancement
Correcting the color is as important as adjusting the brightness and contrast. Yellow tones can be a common issue. This is usually caused by stains, lighting conditions, or even the natural color of teeth. Proper color correction removes unwanted tones. This is best achieved using adjustment layers and color balance adjustments. The aim is to maintain a natural look. This will give a more balanced and appealing appearance.
Adjusting Color Balance
To adjust the color balance, go to Layer > New Adjustment Layer > Color Balance. In the Color Balance panel, make subtle adjustments to the Midtones, Shadows, and Highlights. Focus on reducing the yellow tones and introducing a touch of cyan or blue. Be cautious not to overdo this; subtle changes are key. Proper color balance is essential to produce a natural result. This ensures that the teeth blend seamlessly with the surrounding features. This will enhance the overall quality of the image.
Adding a Touch of Saturation

Adding a small amount of saturation can help to make the teeth look more vibrant, but this must be done carefully to avoid an artificial appearance. Create a new Hue/Saturation adjustment layer. Decrease the overall saturation slightly or adjust the individual color channels to remove any unwanted hues. The goal is to enhance the natural color, not to introduce an overly bright white that looks unrealistic. When you apply these adjustments in moderation, you can achieve a beautiful balance.
Removing Yellow Tones
One of the most common goals of teeth whitening is to remove yellow tones. This can be achieved by using the Hue/Saturation or Color Balance adjustment layers, as described earlier. Go to Layer > New Adjustment Layer > Hue/Saturation. In the Hue/Saturation panel, select the Yellows channel. Adjust the Hue slider slightly towards blue or cyan to neutralize the yellow. You can then adjust the Saturation slider to decrease the intensity. The result should be whiter teeth without looking unnatural. The adjustments will remove any unwanted yellowing.
Final Touches and Exporting
With the teeth whitened and color corrected, there are still a few final touches to consider before exporting the image. These minor adjustments help to refine the image. It will enhance its overall appearance, which will lead to a more polished and professional result. This is the culmination of all your efforts. The final steps will pull it all together.
Sharpening the Image

Sharpening can add clarity and detail. Create a merged copy of all visible layers by pressing Ctrl/Cmd + Shift + Alt/Option + E. Go to Filter > Sharpen > Unsharp Mask. Apply a small amount of sharpening with a low radius and threshold. Over-sharpening can create unwanted artifacts. The aim is to make the teeth and the overall image look more crisp. However, remember that the effect should be subtle, and it should complement the rest of the photo.
Saving Your Whitened Image
Finally, it’s time to save your image. Go to File > Save As and save the image as a JPEG or PNG file. If you plan on further editing or need to maintain all the layers, save the file as a PSD (Photoshop) file. Select the quality settings appropriate for your intended use. For online use, a lower file size is often preferred. For print, a higher quality setting is recommended. Once this is complete, the photo is ready for its final use. Saving your images correctly is just as important as editing them.
In conclusion, mastering teeth whitening in Photoshop provides a valuable skill. The techniques described will enable you to transform images with precision. Always prioritize natural and realistic results. Remember to practice and experiment with the tools and techniques. With patience and attention to detail, you can elevate your image-editing abilities. This will lead to more professional-looking results. These are skills that will enable you to achieve a professional level of photo editing.