Understanding DIY Teeth Whitening
Achieving a sparkling smile doesn’t always require expensive trips to the dentist. DIY teeth whitening methods have gained popularity as a cost-effective and convenient alternative. This guide delves into various at-home techniques that can help you brighten your teeth and boost your confidence. We’ll explore different methods, from using common household ingredients to adopting healthy habits, all aimed at helping you achieve a dazzling smile from the comfort of your own home. It’s essential, however, to approach these methods with understanding and care, as the effectiveness and safety can vary.
Benefits of DIY Teeth Whitening
DIY teeth whitening offers several advantages, making it an appealing option for many. These benefits often extend beyond the mere improvement of aesthetics, offering a more accessible and personalized approach to dental care. Understanding these advantages can help you make an informed decision about whether DIY teeth whitening is right for you.
Cost-Effective

One of the most significant advantages of DIY teeth whitening is the cost savings. Professional teeth whitening treatments can be expensive, often requiring multiple sessions and follow-up care. DIY methods, on the other hand, typically involve using readily available and affordable ingredients, significantly reducing the financial burden. This affordability makes it accessible to a broader audience, allowing more people to achieve their desired smile without breaking the bank.
Convenience
DIY teeth whitening offers unmatched convenience. You can whiten your teeth at any time, in the comfort of your own home, without the need to schedule appointments or travel to a dental clinic. This flexibility is particularly beneficial for those with busy schedules or limited mobility. With DIY methods, you have complete control over the process, allowing you to adjust the frequency and intensity of treatments to suit your needs and preferences.
Natural Ingredients
Many DIY teeth whitening methods utilize natural ingredients, appealing to those who prefer to avoid harsh chemicals. Ingredients like baking soda, hydrogen peroxide, activated charcoal, and coconut oil are often used, offering gentler alternatives to professional treatments. This approach can be particularly beneficial for individuals with sensitive teeth or those concerned about the potential side effects of chemical-based products. The use of natural ingredients also aligns with a growing trend towards holistic and eco-friendly health practices.
DIY Teeth Whitening Methods

Several DIY methods have gained popularity for their potential to whiten teeth. However, it’s crucial to approach these methods with caution, understanding both their benefits and potential risks. Proper research and informed decision-making are essential to ensure a safe and effective experience. Here are some popular DIY teeth whitening methods, along with the necessary information to make an informed choice.
Baking Soda and Hydrogen Peroxide
Baking soda and hydrogen peroxide is a common DIY teeth whitening combination. Both ingredients have properties that can help remove stains and brighten teeth. Baking soda acts as a mild abrasive, helping to scrub away surface stains, while hydrogen peroxide has bleaching properties that can penetrate the enamel. This method is relatively inexpensive and readily accessible, making it a popular choice for those seeking a DIY whitening solution.
How to Use Baking Soda and Hydrogen Peroxide
To use this method, mix baking soda and hydrogen peroxide into a paste. The ratio is usually two parts baking soda to one part hydrogen peroxide, but you can adjust it to achieve a consistent texture. Apply this paste to your toothbrush and gently brush your teeth for about two minutes. Rinse thoroughly with water after brushing. It’s important to note that this method should not be used frequently, as excessive use can damage enamel.
Potential Risks and Side Effects

The main risk of using baking soda and hydrogen peroxide is the potential for enamel erosion. Baking soda is abrasive, and excessive brushing can wear down the enamel, making teeth more susceptible to sensitivity and decay. Hydrogen peroxide can also irritate the gums, leading to discomfort. Some users may experience increased tooth sensitivity or a burning sensation. It is essential to limit the frequency of use and consult with a dentist if any adverse effects occur.
Activated Charcoal
Activated charcoal has become a popular ingredient in DIY teeth whitening due to its absorbent properties. It is believed to remove stains and toxins from the teeth, resulting in a whiter smile. Unlike some other methods, activated charcoal is relatively gentle, making it a potentially suitable option for individuals with sensitive teeth. The fine particles of charcoal act as a mild abrasive, helping to polish the teeth and remove surface stains.
How to Use Activated Charcoal for Whitening
To use activated charcoal, moisten your toothbrush and dip it into the charcoal powder. Brush your teeth gently for two minutes, focusing on all surfaces. Rinse your mouth thoroughly with water, ensuring all charcoal particles are removed. This may require several rinses. It is crucial to use a soft-bristled toothbrush to minimize the risk of enamel abrasion. Some users also follow up with regular brushing with toothpaste to ensure thorough cleaning.
Safety Precautions

While generally considered safe, activated charcoal can still pose some risks. Overuse can lead to enamel erosion, increasing the risk of tooth sensitivity and decay. It is essential to use activated charcoal sparingly, no more than a few times per week. Ensure that you purchase food-grade activated charcoal to avoid harmful additives. Additionally, consult your dentist before using activated charcoal, especially if you have any pre-existing dental conditions or sensitive teeth.
Coconut Oil Pulling
Coconut oil pulling is an ancient Ayurvedic practice believed to remove bacteria and toxins from the mouth. It is thought to contribute to whiter teeth by reducing plaque buildup and removing surface stains. Coconut oil is a natural antibacterial agent, and its properties can help promote oral health. This method is considered gentle and safe, making it a popular choice for those seeking a natural approach to teeth whitening.
How to Perform Oil Pulling for Whitening
To perform oil pulling, take one to two tablespoons of coconut oil and swish it around in your mouth for 15-20 minutes. Ensure the oil reaches all areas of your mouth, including between your teeth. After the recommended time, spit the oil into a trash can to avoid clogging your sink. Rinse your mouth thoroughly with water and brush your teeth as usual. The oil should appear milky or yellowish after the process, indicating that it has absorbed bacteria and toxins from your mouth.
Effectiveness and Results

While coconut oil pulling is promoted as a teeth-whitening method, scientific evidence to support its effectiveness is limited. Some studies suggest it can reduce plaque and gingivitis, which can indirectly contribute to whiter teeth. Results may vary depending on individual factors, such as the severity of staining and the frequency of use. While it may not provide dramatic whitening effects, oil pulling is a low-risk practice that can contribute to overall oral hygiene and health. Regular oil pulling, combined with other oral hygiene practices, can help maintain a brighter smile.
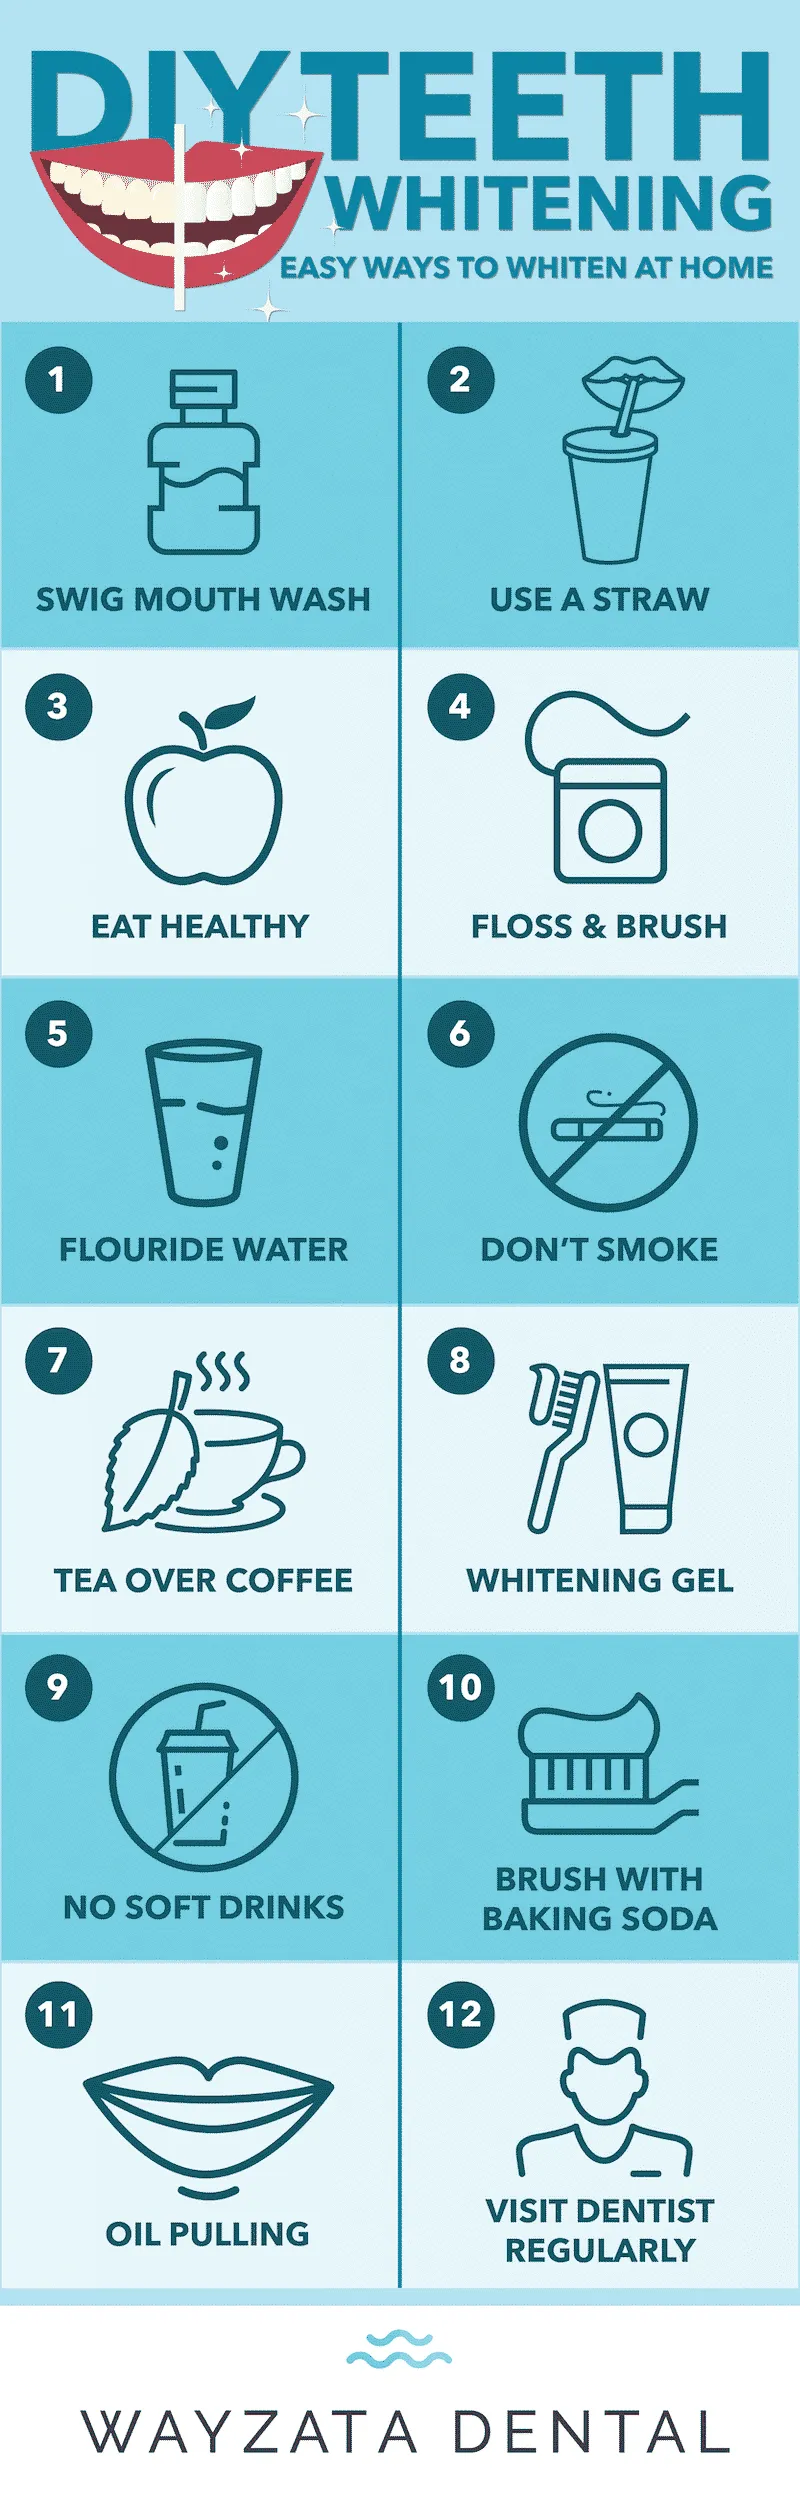
DIY Teeth Whitening Tips and Tricks
Enhancing your DIY teeth whitening efforts involves more than just using whitening agents; it also includes adopting a proactive approach to oral hygiene. Incorporating the right techniques and habits can significantly improve your results and maintain a healthy, bright smile. Here are some essential tips and tricks to maximize the effectiveness of your at-home teeth whitening routine and keep your teeth looking their best.
Brush Correctly and Regularly
Proper brushing technique is crucial for maintaining a bright smile. Brush your teeth twice a day for two minutes each time, using a soft-bristled toothbrush. Hold your brush at a 45-degree angle to your gums and use gentle, circular motions to clean all surfaces of your teeth. This technique effectively removes plaque and food particles, preventing the buildup of stains. Make sure to replace your toothbrush every three months, or sooner if the bristles become frayed.
Floss Daily

Flossing is essential for removing plaque and food particles from between your teeth, where your toothbrush cannot reach. Use about 18 inches of floss, and gently guide it between your teeth using a sawing motion. Curve the floss around each tooth, moving it up and down to remove any debris. Regular flossing not only improves your oral health but also helps prevent the accumulation of stains, contributing to a brighter smile. Make flossing a daily habit for optimal results.
Limit Staining Foods and Drinks
Certain foods and drinks can stain your teeth, negating your whitening efforts. Limit your consumption of staining agents like coffee, tea, red wine, and dark-colored berries. If you consume these items, rinse your mouth with water afterward to minimize their impact. Using a straw when drinking dark-colored beverages can also help reduce contact with your teeth. Being mindful of your diet will help to preserve your bright, white smile for a longer period.
Stay Hydrated
Drinking plenty of water is essential for overall health and can also contribute to a brighter smile. Water helps rinse away food particles and bacteria, reducing the buildup of stains. It also stimulates saliva production, which naturally cleanses your mouth. Staying hydrated is beneficial for your oral health and helps to maintain the effectiveness of any teeth-whitening treatments. Make sure to drink plenty of water throughout the day.
Professional Teeth Whitening vs DIY
When it comes to teeth whitening, the choice between professional treatments and DIY methods depends on your individual needs, budget, and desired results. Understanding the pros and cons of each option is essential to making an informed decision. Professional teeth whitening offers advanced techniques and higher concentrations of whitening agents, while DIY methods provide convenience and affordability. Both options have their advantages and disadvantages.
Pros and Cons of Professional Whitening
Professional teeth whitening performed by a dentist provides several benefits. Dentists can use stronger bleaching agents, often achieving more dramatic and quicker results. They also have the expertise to identify and address any underlying dental issues that might affect the whitening process. However, professional whitening treatments can be expensive, and some individuals may experience increased tooth sensitivity. The cons include higher costs, potential discomfort, and the need for multiple visits. It is an effective method, but consider the financial and time commitment involved.
Comparing Costs and Results
The cost of teeth whitening varies significantly between professional and DIY methods. Professional treatments can range from several hundred to over a thousand dollars, depending on the method used and the dentist’s fees. DIY methods, on the other hand, typically cost much less, often relying on affordable household ingredients. The results also differ. Professional whitening generally provides faster and more dramatic results, while DIY methods may offer a gradual improvement. Consider your budget, desired results, and time commitment when comparing these options.
Maintaining Your Sparkling Smile
Once you’ve achieved a brighter smile, maintaining your results is essential. This involves adopting healthy habits, following a consistent oral hygiene routine, and seeking regular professional care. Long-term maintenance ensures your smile remains bright and healthy. Incorporating these practices into your daily life will not only preserve your white teeth but also contribute to your overall oral health and well-being. The goal is to enjoy your dazzling smile for years to come.
Importance of Regular Dental Check-ups
Regular dental check-ups are crucial for maintaining oral health and preserving the results of your teeth whitening efforts. Your dentist can identify and address any dental issues, such as cavities or gum disease, that could impact your smile. Professional cleanings remove plaque and tartar buildup, which can contribute to stains. Regular check-ups also provide the opportunity to discuss your whitening results and any concerns you may have. Aim to visit your dentist every six months for optimal oral health.
Using Whitening Toothpaste
Whitening toothpaste can help maintain the brightness of your teeth by removing surface stains. These toothpastes typically contain mild abrasives and/or chemical agents that help to polish the teeth. Use whitening toothpaste as part of your regular brushing routine. However, be aware that they may not be as effective as professional treatments or stronger DIY methods. Choose a whitening toothpaste that is gentle on your enamel and contains fluoride to protect against cavities. Incorporate it into your daily routine for sustained results.
Lifestyle Choices for Long-Term Whitening
Your lifestyle choices significantly impact the longevity of your white teeth. Avoid or limit staining foods and drinks, such as coffee, tea, and red wine. If you consume these items, rinse your mouth with water immediately afterward to minimize staining. Quit smoking, as tobacco use is a major contributor to tooth discoloration. Practice good oral hygiene by brushing and flossing regularly. Staying hydrated and maintaining a balanced diet also play crucial roles. Making these choices will contribute to a lasting, sparkling smile.